Chicken and Dumplings

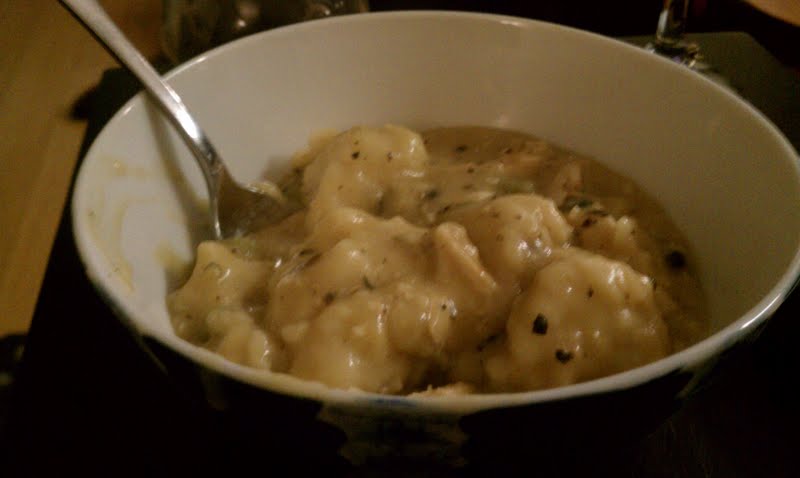
Night after night of nostalgic food sure is fun! Chicken and Dumplings is another childhood favorite. One of those – I like the one that my momma makes the best and cannot ever stray to far away from it or I will not like it – meals. Everyone has their favorite version and I swear I am not knocking them, but if you put a soup with some dumplings and a bunch of carrots in front of me and call it chicken and dumplings I will make a huge scene about how it is an imposter!!!  (unless the plate is placed in front of me by Thomas Keller or Wylie Dufresne…I will eat anything they place in front of me without a thought in my head except maybe amazement, wonder, and happiness). Proper Chicken and Dumplings. I tried for years (before I actually knew how to cook) to make this like my momma and never could so, brimming with disappointment,  I put the idea , along with the heart-healthy Bisquick, on the shelf for a while. Then I learned how to cook and decided to try again one night. Much better results but,  still not like momma made it – it was sweeter almost. For comparison sake, soon thereafter I asked my mom to make it for me. I knew almost instantly what the problem was. Verdict: throw out your “healthy” Bisquick and use the regular stuff! Makes all the difference. Now I make them exactly the way I love them (albeit a bit different from my momma’s but there is a very strong resemblance) and there is no low-fat Bisquick involved. If you think about it saying a processed food is more “healthy” than some other processed food is – well – absurd…it is all bad for you so eat it sporadically and, when you do, get the good stuff.

One Box plus 1/2 cup of Good Quality Chicken Stock
2 Bay leaves
Salt and Pepper to taste
1.5 – 2 chicken breasts (seasoned with salt, pepper, cayenne, and herbs de provence)
3.5 cups Bisquick mixed with enough water to bind
3 celery stalks, sliced a little under a quarter inch thick
2-3 garlic cloves, finely minced
one large shallot, chopped
splash of white wine
2 tablespoons olive oil

In a mixing bowl, mix Bisquick and water until you have a thick dough. Reserve.

Heat 1.5 tablespoons oil in a skillet. Season chicken and place in hot oil, brown on each side. Remove from pan and reduce heat so as not to burn the mirepoix. Add garlic, shallots, celery and bay leaves (with a pinch of salt) to the pan and scrape bottom well to coat with chicken bits leftover. After a few minutes, hit the mixture with a splash of white wine and allow to cook off. Pour in all of the chicken broth and bring to a boil. Gently drop dumpling mixture into the liquid a spoonful at a time until it is all gone. Add salt and pepper and stir once. Reduce heat and simmer, uncovered for 20 minutes. Stir again and cover. Continue simmering for another 20 minutes. At some point during the simmer time, slice chicken into thin slices, then cut in half and reserve. About five minutes before the dumplings are ready, add sliced chicken, salt as needed and pepper and stir. Five minutes later and you are done. Good luck not eating the whole pan.

Coconut-Ginger Rice

I make this rice with my tartar, as you have inevitably noticed on here more than once. It is excellent as a base for a noodle-free stir fry as well as plain if you have an upset stomach. I tend to have stomach issues, so I use large amounts of ginger, more than the two tablespoons I list in this recipe. You can use any rice that you have on hand, I use Basmati ubiquitously because it is the most fragrant white rice that you can buy in the states.

Coconut Rice

One cup Coconut Milk
Two Tablespoons Ginger People Minced Ginger
One tsp salt
Half cup of Basmati Rice

Bring milk, ginger and salt to a boil in a small saucepan. Add rice, cover, reduce to simmer. Cook for ten minutes and fluff.

Little Ears

One of my favorite pasta dishes is one that created on a particularly lazy “let’s hang out and not go to the store” night. My friend Kelly and I were having a slumber party and the menu was based on the ingredients that we had that desperately needed to be cooked. The original for this dish was created and now it part of my kitchen arsenal for something easy, satisfying and versatile. I also call this the “best pasta ever” in a previous post – a good indicator of how much I love it. I have decided to officially call it “Little Ears” because I always use Orecchiette, which means “small ear” in Italian. You can add as much or as little to this as you want. The original version had only shallot-white wine sauce as a base, fresh mozzarella, cherry tomatoes and basil and it was incredible. This version strays from the original but still boasts the basic ingredients.

Two tips – actually more like two very, very strong suggestions: 1) Use Rustichella d’abruzzo Orecchiette. This is the BEST brand that I have found and this dish really is not the same with other brands. Trust me, I learned the hard way. The Whole Wheat kind of this brand is absolutely incredible – though now I have to special order it as Whole Foods now only sells regular Orecchiette and Central Market sells the brand but not the type at all. 2) You will want to cook the pasta until just under al dente, strain and the allow to finish cooking in the sauce so that the pasta absorbs all that yummy flavor. These are both good tips for any pasta dish that you make in the future =)

Little Ears, about 3 servings

One Half to Two-thirds box of Rustichella d’abruzzo Orecchiette
One pint cherry tomatoes, halved and seeded
Small amount of shredded Pecorino Romano cheese for serving
One cup of Shredded Cheese (half Mozzarella, half smoked Provolone)
Two cups Baby Spinach
One Zucchini, quartered
1 cup chopped fresh basil
Fresh ground pepper
Salt to taste, plus ample salt for pasta water
One Shallot White Wine Sauce Recipe
1/4 Cup Starchy Pasta Water


Boil salted water and cook pasta to instructions, under-cooking by two or three minutes. When straining, reserve some pasta water to add to sauce.

Begin making shallot white wine sauce (make enough for the amount of sauce that you want). Add Zucchini at the stage when the shallots and garlic become glassy. Saute for a minute or so before adding liquid. Reduce liquid, then halved tomatoes and cook until the skins loosen and tomatoes lose their shape slightly, if you have not already (and you need more sauce) add the pasta water. Add spinach and allow to wilt just slightly. Put  Combine with pasta and allow to cook a few more minutes. Add half of the basil, salt to taste, add pepper and cheese and stir gently but well. Garnish with remaining basil and some shaved Parmesan or Pecorino and serve. This is an excellent side for your favorite baked fish or chicken or with Andi’s Favorite Chicken. It is also a great way to use up leftover chicken – you can shred it and throw it in the pasta or serve it alongside!

I literally eat this with my hands for breakfast the next day! Enjoy!

Gooey Butter Cake

You might be aware from reading my previous posts that D loves and reveres Gooey Butter Cake, which is a St. Louis specialty that is served with breakfast and as snacks. I am willing to bet there have been fist fights over who makes the best GBC. D’s absolute favorite is his best friend’s mothers version which is also considered the best by a native St. Louis-an (this same person is an Italian grandmother in case a native to St. Louis did not hold enough weight for you). I was a bit of a brat over the weekend (sorry everyone) and so decided that I would try to make the Gooey Louis…look at me making dessert twice in two weeks. The thing with baking is that it has to be done precisely – measurements MATTER or the end result might have an off consistency. Considering my measuring cups have dust on them – or on their better days are used as spoon holders – baking is not a strong suit. Couple this “precision” weakness with my lack of desire for sweet treats and I just do not bake often. This aversion is apparent in my baking supplies: my flour was one year and two months expired – I wish I was kidding. All that said, I would like to start baking more and maybe one day I will smell less like garlic and more like cookie dough. =) Which brings me to the cake attempt. This was my first attempt with making a cake of anything other than Duncan Hines Red Velvet Cake (HEAVEN by the way) and I scoured recipes all day trying to devise a plan. I ended up using something like a combination of three recipes because there are two ways the cake is prepared. One is the traditional-but-made-in-bakeries method and the other is the home-kitchen-friendly method. The traditional uses corn syrup (which I just could not bring myself to buy) and also uses yeast for the crust dough. Sounds great in theory, but in reality, it was Wednesday night and I did not have time to make a yeast-dependent dough and deal with the rising process. In my pursuit of the perfect recipe (I was lacking D’s favorite at this point so I was trying to somehow develop telepathy and guess the ingredients), I ran across a blog that discussed both methods – traditional versus easy-to-make-at-home version. Traditional won. So I decided to do something of a hybrid. I did not buy yellow cake mix at the store and instead had to “make” my own. I then used the non-traditional filling for ease and to avoid buying corn syrup. What is ironic about all of this is the email I received with D’s favotire recipe (Mrs. Rodriguez was wonderful enough to send it to him whilst I was walking back from Whole Foods – in the rain) and she used ingredients I did not buy! Aw Shucks! I was not about to venture out in the storm that opened up right when I was leaving the store, so I intend on making this again soon. This time with a cohesive plan, flour that is not expired, with yellow cake, and without accidentally skipping a step. Minor flaws aside, this cake smelled absolutely incredible and tasted pretty good – though it was not exactly like the gooey that Mrs. Rodriguez makes (and D loves). I need a few more trial and errors but, who knows,  maybe one day I will get this baking thing down! Oh, in case you are wondering – I still do not really know what Gooey Butter Cake tastes like as I did not have any – it amazes me how I cannot get out of the preztel jar but this delicious thing I have no aversion problems at all. I have issues…
For Crust
2 cups Flour
1.5 cups Sugar
One Stick Butter, melted
1 tablespoon baking power
1 teaspoon salt
2 eggs
1/4 cup milk
For Filling
3 tablespoons butter, melted
2 eggs
1 (8oz) Cream Cheese (room temperature)
1 Box Powdered Sugar
1 1/2 tablespoon Vanilla Extract
One teaspoon Almond Extract
Add the crust ingredients to a mixer and mix well.  Spread into an ungreased 9×13 glass baking dish. In separate bowl mix remaining ingredients, minus 2 tablespoons for topping. Mix well and spread over batter.
Bake at 350 degrees for 15 minutes, remove from oven to sprinkle remainder powdered sugar. Return to oven and bake an additional 25 – 30 minutes.

Black Bean – Mango Salsa

When mangoes are in season, I love to mix them with avocado and such things to top dishes off or as a healthy dip. This is interesting as I do not typically eat mangoes on their own – they are just a tad too sweet for me. But when mixed with other elements, the sweetness is decreased and I enjoy them immensely! This salsa is very versatile and cost effective.  It can be used in tacos, on grilled fish or baked chicken, as a dip or a salad topper.

  • One can Black Beans
  • Two Mangoes, diced
  • Half red onion, small dice
  • One cup cilantro, chopped
  • One avocado, diced
  • One Jalapeno, minced
  • 1.5 cups Jicama, diced
  • Juice from one lime, mixed with pinch of salt and a little bit of olive oil (or garlic olive oil)
  • Cayenne, Garlic Powder, Cumin, and Adobo spices as desired

Combine all ingredients in a bowl and mix well (but gently). Season as desired.

Chipotle Aioli

Chipotle Aioli is a great sauce to make and keep in the fridge. You can throw it onto/into all sorts of things from sandwiches to tacos to grilled fish or chicken to sweet potato fries to  tempura fired veggies. You can also make this to your dietary needs as well. I imagine this can be made quite successfully with yogurt and when using the sauce in an Asian dish feel free to use Japanese Mayonnaise instead of American (this is what I do and use as a dip for tempura-fried sweet potatoes).

Half can Chipotle Peppers in Adobo
Half cup of Garlic Mayonnaise (Central Market sells Garlic Mayo or you can add roasted garlic to regular Mayo)
Half lime, juice squeezed

In a small food processor, blend the Pepper, Mayo, and lime juice until desired consistency is achieved. Add more mayo if you find it too spicy.

Coconut Shrimp and Chicken Tacos

Friday we were heading to the lake to celebrate D’s momma’s birthday. I knew I wanted to cook but, as with most nights, had a short list of at least seven dishes. We narrowed it down to fish tacos and spinach pasta with veggies. D lobbied for spinach pasta (naturally as he averse to fish) and I let him. This concession was made largely because I was forming a plan to make fish or shrimp tacos the next night at my parent’s house (for mother’s day). Normally, as you can tell from my previous fish taco post, I crust the fish in question in chile-corn crust. I did not have time to the desire to go to Central market to get this, so I decided I would make my own crust (it is fairly easier to make Chile-Corn Crust, but I really just was not in the mood for some reason). Flash forward and I devised a plan for a chile-coconut-panko crust. And then comes the second concession of the weekend, I prepared both chicken and shrimp so that everyone could have something they enjoyed. One note – I did not have an egg for the shrimpies (well, in reality there was an egg in the fridge – I just could not find it until I had already crusted the shrimpies so the chicken got it but not the fish – one of many Jessica Simpson moments I experienced that day) and so they were not quite as brown and crispy. I also baked them for health reasons – feel free to pan fry them if you like as they will become extra crispy! Oh, and for the record, yes you did just read “shrimpies.” This is what my mom has called shrimp since I was born, ergo, shrimpies are shrimp. I also say grape-ies, but that is another story….

For the Marinade

One can coconut milk (lite or regular)
Two Limes
One pound Shrimp
2 chicken breasts, cut into tenders then halved
4 tablespoons Sriracha
2 tablespoons Tempura Sauce
2 teaspoons Curry Powder
2 ziplock bags

In one Ziplock, combine half of the coconut milk, half Sriracha, half tempura, half curry powder, and juice from one lime. Add peeled shrimp to this and refrigerate for about at least 2 hours. Repeat process with chicken and second ziplock bag. Adjust curry and Sriracha use to preference.

Crust (divide all ingredients between two plates – if only doing chicken or shrimp then use half of what I call for)

3 cups Panko
2 tablespoons Cayenne
A couple pinches of red Chile flakes
3 cups shredded coconut *
Salt
Pepper
Add other seasoning as desired – I added just a pinch of adobo
Two eggs, beaten in separate bowls or dishes for dredging

If baking, grease a slatted cookie sheet and preheat oven to 400. Once shrimpies are crusted, place on the baking sheet until all are crusted. Bake for about 10 minutes, until crust is golden brown. Squeeze extra lime juice over the baked shrimp if desired. Same process for chicken.

If frying, fill a fry-pan with an inch of oil. Heat to appropriate heat (check by dropping a bit of crust into hot oil – when it sizzles on impact it is ready). Add shrimp or chicken one at a time with a slotted spoon or tongs (preferably the latter). Fry until golden brown. Remove to a drying rack or plate with a napkin on it and salt just a touch. Squeeze with lemon if desired.

*If using unsweetened coconut, add a bit of honey to the marinade. If sweetened coconut, omit honey.

Taco Bar

Half head shredded red cabbage or radicchio
Shredded Cheese (suggestions: Cheddar and Jack mixture or Queso Fresco or Cojita Cheese)
Chipotle Aioli
Black Bean-Mango Salsa
Sliced Avocado
Fresh Lime Juice
Chopped Cilantro
Corn and Flour Tortillas, Warmed

Build your taco as desired!

No-Butter Garlic Bread

I am aware that most people know how to make garlic bread. I am also aware that this is a fairly boring version of garlic bread. However, mixing garlic with cheese is not “garlic bread,” it is cheesy garlic bread (and it is fabulous). There are loads of variations for this, but this particular garlic bread is incredible when floated into  soups or brothy dishes because it is toasted longer than normal and individually sliced instead of toasted as a loaf. It is also fantastic when thrown into a food processor and made into homemade bread crumbs – I promise that you will not get the same crunch from the canned kind. This version is also healthier than the garlic bread that most people typically think about – it is not dripping with butter (not that things dripping with butter are in any way appetite suppressing, they just simply add too much jiggle to my thighs) and it still has a great deal of flavor. That said, man do I love cheesy garlic bread…Advice for cutting your bread if you do not elect to have your baker do it for you – use a serrated knife. You will make your life easier.

Half loaf of Ciabatta bread (or similar), sliced
Five cloves garlic, finely mined
Favorite Oil (I use garlic or basil oil usually), put into a small container
Small handful of fresh parsley, chopped
Paprika
Cayenne (optional)
Fresh Black Pepper, to taste

Brush each side of the bread with a bit of oil, place on a baking rack or tray that has holes or slats. Sprinkle each piece of bread with Cayenne, Paprika, and Pepper. Top with an ample amount of garlic and parsley. Bake for about five to seven minutes at 375. Serve with Soup or baked tomatoes or turn into homemade bread crumbs.