Meat Sauce

Taste buds are a funny thing. To say that I was a picky eater during my formative years is a colossal understatement. I subsisted mainly on cereal and PB&H sandwiches (honey girl all the way – to this day I do not touch jelly). Additional food groups, consumed during my youth were: meat and potatoes (English dad), tamales and popcorn (Venezuelan mom) and massive quantities of pasta (swimmer). As an early-college student I lived off of pretty pasta, cereal, PB&H, Totino’s pizza rolls, Taco Bell (a fact which is possibly one of the greatest regrets of my life to date) and Chick-fil-a. The list of foods that I would not eat was as long as the Monday after the Superbowl until my mid-twenties. On that list: any tomato-based sauce.

I never ate tomato sauce. EVER. I ordered pizza sans sauce. I pitched fits, reusing to eat anything that I even thought included tomato sauce (this lead to many full-blown tantrums over lasagna that I refused to eat even out of politeness at friends of my parents). In all fairness, my tomato sauce aversion was not irrational picky-ness. When I was 11, I got the flu after spaghetti night and threw up red sauce for three days (all over white carpet much to my mother’s dismay). From that day forth,  the sight of tomato sauce sickened me. Until the past year. I started small, eating my pizza with a light layer of tomato sauce, dipping my Rocket Pockets in Meaty Porcini Marinara and eating copious amounts of tomato soup. But recently, I have been on a full blown tomato-based sauce kick. I have experimented with Pomodoro sauce, but my biggest craving (and it is a damn strong one) has been for meat sauce. So strong this craving has been that I made meat sauce four times in five weeks (and hoarded every batch). This intense craving is [thankfully] not pregnancy craving-related, so I have only by taste buds to blame – however bewildered that makes me (and anyone who has known me longer than a year or two).

I have altered the versions a couple times and each one has been sensational. I personally like my veg to be a little less processed because I like to bite into a carrot every now and then, but feel free to process the heck out of the veggies to make the sauce more silken. I added miso paste to two batches to up the umami factor with very tasty results. Between the umami-packed miso and the Parmesan cheese rind, which lends a unique depth of flavor that cannot be emulated, the meat sauce has that awesome “Je ne sais quoi” quality that coaxes you to have bite after bite. Whether that is a good or bad thing is up to you (I do know that I have put on some pounds that are directly correlated to my increased sausage intake). Feel free to include miso and rinds if you have them on hand, but the meat sauce will be just as spectacular in their absence. Brief side note, you can now buy Parmesan cheese rinds at HEB.

In an effort to cut calories and ingest something of nutritional value, I typically eat my meat sauce with spaghetti squash versus pasta. Feel free to use fresh or dried pasta, squash, polenta or baked potatoes as your meat sauce vessel. I actually ate meat sauce soup on a least 10 different occasions. Don’t judge – I  love my meat.

 Meat Sauce 

Serves 4-6 (or one if you are me)

meat sauce

One medium yellow onion

One and one-half large carrots, peeled and cut into one-inch pieces

One celery stalk, cut into one-inch pieces

Ten garlic cloves

One 28-ounce can of whole peeled tomatoes

One pint Cherry Tomatoes, divided

One-Fourth cup Olive Oil

Kosher Salt and Freshly Ground Black Pepper To taste

Crushed Red Pepper, to taste

One-Half Cup Flat Leaf Parsley

Two Tablespoons Fresh Oregano

One pound hot Italian Pork Sausage (bulk or removed from casings)

One pound ground beef

One tablespoon tomato paste (plus a squeeze or two more)

One scant tablespoon Miso Paste (mellow) Optional

One Parmesan Rind (optional)

Two cups water (or beef stock)

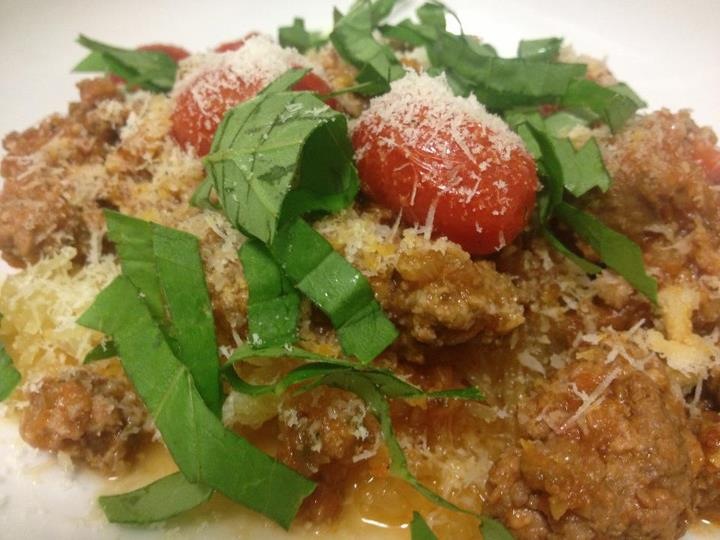
One spaghetti squash, halved, seasoned and roasted

Ten Basil Leaves, Julienned

Three-fourths cup Pecorino Romano

In a large food processor, pulse onion, garlic, celery, carrot, oregano, and parsley and pulse until finely ground.  Transfer to a small bowl and reserve. Using the food processor, puree the tomatoes (juices included) until smooth. Heat oil in a large dutch oven (or other heavy pot) and add sausage and cook until browned (about four minutes). Add beef seasoned with salt, pepper and Italian seasoning (latter being optional) and brown until no longer pink. Transfer meat to a plate using a slotted spoon and reserve. Add reserved veggie mix to the pan, season with salt, and cook for about eight minutes (stir often). Combine tomato paste with one cup of water (or stock) in a small bowl and add to the pan, scraping the bottom bits. Reduce heat and simmer until liquid is nearly evaporated. Add tomato puree, crushed red pepper, half of the cherry tomatoes, one [additional] cup water – or stock – and the browned meat to the pan and bring to a boil. Upon achieving a boil, immediately reduce heat to a simmer. Add more water as necessary to ensure that the meat remains nearly submerged the entire cooking time.

Once the meat sauce has simmered for two to three hours, add the cheese rind and miso paste if using. Check for salt and pepper content and adjust as necessary throughout the cooking process. Simmer for an additional two to three hours and remove from heat. Roast remaining cherry tomatoes with olive oil, salt and pepper whilst the squash is roasting. Serve with roasted spaghetti squash (or other meat sauce vessel of choosing), topped with Pecorino Romano and Basil.

Faux Porky Pho

Homemade Faux Porky Pho

Any mention of “Pho” and my mouth waters. I mean serious droolage. I dubbed this “pho” faux because I veered from the traditional ingredients and pho making method and also because Faux is the incorrect pronunciation of Pho. The correct pronunciation sounds like “fuh.”  “Porky” made it to the title because I used multiple versions of porky goodness. Many thanks to James and Sus who smoked two pork butts for a housewarming party recently; I am definitely a butt girl. I have raved about these in my Bacon Wasabi  Slaw post previously so I will spare you a second emphatic accolade – though these fine specimen’s of God’s Meat deserve at least a second mention.

If you were actually making pho at home, you would likely have more ingredients and a longer cooking time. Because I was using up stuff that I had made previously, I did not need to roast bones, simmer meat, and infuse broth with the flavors of onion and other ingredients so my cooking time was much less. I  used shredded pork butt  as my meat versus meatball or shaved beef. I used some non-traditional toppings, including  Bacon Wasabi Slaw in place of bean sprouts. The broth was a combination of homemade chicken stock, pork juice and jelly, and some purchased Beef Pho base (Pacific Kitchen brand) along with most of the traditional pho seasonings (I left out fennel because I did not have any and added turmeric because it is good for you). I also subbed soba noodles for rice vermicelli to eliminate soaking them. Fauxness aside, this homemade pho was faux-king DELICIOUS. The broth was rich with intriguing depth and layers of flavor. It managed to satiate the perpetual pho craving I cannot seem to kick.  Seriously, there should be pho rehab.  I imagine this soup would be the gateway drug….and I am a full-blown addict.

As with most everything I make, I have no idea how much of what I threw in, so operate on the usual “guestimate” theory and adjust spices according to your personal preferences. Oh, and I am drooling.

Faux Porky Pho

Serves 2-3, with leftovers

Two Cups Chicken Stock (homemade preferably)
Two Cups Beef Pho Base (substitute chicken or beef stock and add more seasoning)
Half-Cup Pork Jelly (or the gelatin of some other earthly animal)
Juice from half a lime
Two cups pulled pork butt
One tablespoon crushed red pepper
One tablespoon fish sauce
Two to Three tablespoons Hoisin sauce
A good pinch cane sugar
Three tablespoons minced ginger
Sriracha to taste
Five cloves
Half-Tablespoon ground coriander
One cinnamon stick
Two to three star anise pods, whole
One cardamom pod
Half-Tablespoon ground turmeric
Buckwheat Soba Noodles, cooked to package instructions

Toppings
Bacon Wasabi Slaw
Thinly Sliced Jalapeno
Chopped Green Onion
Thinly sliced radishes
Fresh Cilantro, roughly chopped
Lime wedges
Extra Hoisin, Sriracha, and Fish sauce for serving

Combine pork juice, jelly, stock, pho base in a large stock. Bring to a simmer and add the ginger, crushed red pepper, sugar, fish sauce, hoisin, coriander, cardamom, cloves, cinnamon, star anise and turmeric. Let simmer for 30 minutes to an hour and then add the pulled pork. Meanwhile, cook the noodles according to instructions and then add them to the broth. Squeeze in the lime juice and adjust seasoning according to taste. Serve with suggested toppings.

Bacon Cornbread

I ate an entire cast iron skillet full in under 56 hours and I did not even feel bad about it; it was that scrumptious. This is a hybrid-type meal (believe me I made this cornbread a meal and snacks and dessert – If I could find a way to liquify it and retain the texture and the favor I would have consumed it that way as well). This cornbread was inspired by the first variation I tried which was Garlic Nation Cornbread. I had leftover buttermilk and needed to use it to avoid wasting food, so what better than making the cornbread with the bacon I forgot the first time around. The bacon cornbread I made last night did not use chilis and added bacon, shallot salt and cayenne and a small handful of Italian four cheese blend that needed using. I also adjusted this version to incorporate more buttermilk because it needed to be used – and I ended up liking the result more…but that could have been the bacon. Who knows? In theory this was kind of a use-everything-in-the-fridge-because-it-expires-VERY-soon cornbread. One that probably never needs to be made again considering my EXTREME lack of self control when portioning my servings of it. Let me know if you have any questions!

Note: Sorry for the lack of pictures on several recent posts. I got a new phone and lost all photos that were on it. Though in the case of the cornbread, I just wanted to eat it more than I wanted to photograph it.

Bacon Cornbread 

Serves – ONE if you are me, Eight if you have restraint 

17 ounces of favorite corn muffin mix (I used organic stone ground)

Three cups frozen corn kernels

One cup sundried tomatoes, chopped

Handful of favorite cheese (OPTIONAL can be left out – I just needed to use some up)

One can of hatch green chilis, chopped (OPTIONAL)

One cup crisped, thick cut bacon pieces

Ten garlic cloves, finely minced (USE MORE OR LESS TO TASTE)

Penzy’s Shallot Salt (OPTIONAL) or pinch sea salt

Pinch Cayenne (OPTIONAL)

Black Pepper to taste

Two eggs

One cup buttermilk, plus two or three tablespoons more if needed

half cup plus a tablespoon or two sour cream (I think I used significantly less)

Grease a cast iron skillet and crisp up the bacon, cutting into small pieces once done. Reserve grease (or use a napkin to soak up a little but leave the pan greased like I did) to use for baking cornbread. In a large bowl combine the corn mix, corn, salt, cayenne, pepper, sundried tomatoes, cheese, garlic, bacon and chilis and mix well. Add in the eggs, sour cream and buttermilk and stir until all elements are well incorporated. Pour thecornbread mixture into the greased skillet. Bake for about 25 minutes on 375 degrees (NOTE: Bake time will depend on baking vessel used and oven type – general rule is to bake until the top is golden brown, then check the inside with a toothpick. It should come out relatively clear). Cut into pie pieces and serve, preferably to more people than just yourself.

Black Bean Soup

I made a huge batch of this and ate it for the entire week after New Years. It was delicious, healthful, filling and HIGHLY addictive. I decided to make my own after being on a pretty serious black bean soup kick where I was spending almost seven dollars per day at Whole Foods buying their black bean soup. So I planned Mexican night and put black bean soup and Chicken Mole on the menu. Never made it to the Mole, but the soup was outstanding. This had an accidental addition of tomatillos which were intended to be used in the Mole (hence why the Mole did not happen).

I topped mine with a little grilled chicken, avocado, cilantro, green onions, fresh chopped cherry tomatoes and lime juice. Later I mixed it with previously cooked brown rice that needed to be used as well. Feel free to add cheddar cheese or queso fresca or sour cream to the garnish list if you like – I have to avoid the dairy.

Note: Adding the brown rice into the soup acts a thickener and will fortify you if this is your only meal.

Black Bean Soup

Serves 6-8

Three to Four cans of Black Beans, all liquid retained

Four Carrots, roughly diced

One large white onion, roughly diced

Seven cloves of garlic, roughly chopped

Three celery ribs, roughly diced

Three tomatillos, husked, rinsed and roasted

A couple of pieces leftover ham (can omit – I used the rest from Christmas)

Three to four cups chicken or veggies broth 

Two chipotle peppers in adobo and a couple of tablespoons of the sauce

Cup of Brown Rice (optional – I had some on hand)

Array of spices to taste: Shallot salt; cayenne; cumin; garlic; Peruvian Chile Lime seasoning

In a large dutch oven, saute carrots, onions, garlic, celery, and a pinch of salt in a bit of olive oil until they are sweating. Add ham, broth, black beans and their juice and reduce heat to a simmer. Add roasted tomatillos, peppers and some of the seasoning (just add a little bit and then add according to taste later). Add rice and finish seasoning. Let simmer for about thirty minutes. Either use an emulsifier or a blender to process the soup (you can leave it has chunky or make as smooth as you wish). Squeeze a bit of lime juice to taste and enjoy!

Top soup with desired herbs and garnish, my favorites include: grilled and shredded chicken, cherry tomato halves, avocado slices, green onion and cilantro. Other options are sour cream or cheese, mango salsa, red onion, pico, or toasted pepita seeds.

Hatch Green Chile Pulled Pork

Hatch Green Chilis…good. Pulled Pork…amazing. Grits…scrumptious. Combination of the three = Winner, Winner, Porky Dinner! This was another dish (served on top of creamy cheddar grits) that I made during the “Brinner” themed charity dinner party we threw recently. Tender pork, stewed in a wonderfully spicy sauce, just makes the house smell good and bellies happy…no doubt about it.  I am not sure if this was everyone’s favorite of the day, but I do know that D and I had to take the spoons out of each others hands just to we would be able to save it for the actual dinner and there were not any leftovers! You can serve the pork on its own, in tacos, enchiladas, or over grits – as I did. I topped it with a very quick apple-avocado salsa to cut some of the heat and add a little crunch to an otherwise soft dish. I must warn you, this dish was spicy – I used a bit of acid, the creamy grits, and the salsa to balance it out and it worked quite well.

Note: I hate to admit this, but I made this dish about a month ago and did not write down everything I threw in the pan. The following recipe is my attempt to remember, but something may have been left out. Play with it until you get the outcome you want.

Hatch Green Chili Pulled Pork

Two and a Half pounds of Pork Shoulder, cubed
Seven Hatch Green Chilis, de-seeded (quarter half of peppers and dice the rest)
One and One half Cans of Hatch Green Chile Enchilada Sauce (or favorite verde Salsa)
One head of Garlic, minced
One and one half white onion, diced
Three tomatillos, husked
Chicken Broth, as needed
Pinch of each: Cumin, Sugar and Oregano
Fresh Squeezed Lime, to taste

Heat a bit of oil in a large stock pot; add garlic, and onions and saute for a few minutes (with a pinch of salt). Add pork and brown well. Add peppers and saute for a couple minutes. Add Sauce to cover pork, switching to chicken broth once the sauce runs out. Bring to a boil, the add seasoning (cumin, sugar, oregano) and tomatillos and simmer for at least four hours, stirring occasionally. Taste occasionally, adjust seasoning as necessary (squeezing lime juice at the end). Cook until pork is fork tender and can be shredded with no effort. Remove pork from pot and shred, then return to pot.Remove chili quarters and discard.

In a large bowl, place Creamy Cheddar Grits, spoon pork over, then top with Apple-Avocado Relish.

Spinach, Ham, and Eggs Bacon Cups

I found a recipe similar to the one posted below whilst putting together a menu for a “Brinner” themed dinner party. I changed it a little bit and, though I could not eat it, was told that it was yummy. These are pretty simple to prepare and you can bake them individually or in a larger pan (using a little more care).  As I was cooking five different things, picture taking was not my mine priority – so this picture shows an egg that feel to the side (probably because I did not bother to make the well).
Spinach, Ham, and Eggs Bacon Cups
Serves Four
Adapted from Bon Appetit
6 slices applewood-smoked bacon
Four small shallots, diced or thinly sliced
1 5-ounce bag baby spinach One loaf challah bread, cut into ramekin sized rounds, buttered and well toasted 
12 slices ham or prosciutto 
4 large eggs
4 tablespoons heavy whipping cream
A few tablespoons basil pesto (optional)

Preheat oven to 400°F. Cook bacon in large skillet over medium heat until crisp; transfer to paper towels. Pour off drippings from skillet; reserve drippings. Add shallots to pan, saute until glassy then add spinach to pan, sprinkle with pepper, and toss over medium heat, two minutes. Transfer to strainer set over bowl to drain. Brush four 1-cup ramekins with bacon drippings. Crumble bacon and reserve.

Place one toasted piece of challah bread (cut into the right shape) in each ramekin. If using pesto, place a dollop on toast and spread it around.  Top toast with two to three pieces of thin ham or prosciutto. Divide spinach among ramekins, dividing equally. With back of spoon, shape a well in center of each ramekin. Gently crack one egg into well in each ramekin, keeping yolk intact. Drizzle 1 tablespoon cream over each egg. Sprinkle with salt and pepper. Bake eggs until whites are just set but yolks are still runny, 14 to 16 minutes. Top with crispy, crumbled bacon.

Bacon-Corn Ragu

I used this ‘garnish’ as a way to add some salt and savory to a dish with sweeter elements. You can make this in advance and add it to loads of meals such as eggs or a southwestern salad. You can also add other elements to this such as red onion and cilantro and make it a dip (or top a creamy soup with it for some texture).

This makes a rather small portion so feel free to double it.

Bacon-Corn Ragu

One thick slice of pancetta, cut into crispy dice (can be crisped in advance)
Two slices bacon, diced
Three-fourths cup roasted corn kernels
One shallot, minced
One garlic clove, minced

In a medium skillet, saute pancetta and bacon on high heat until crisp and the fat is rendered. Remove from pan and add shallots and garlic and saute until glassy. Add corn and bacon and heat for a couple of minutes. Serve immediately. If you would like this to be slightly spicy, add a pinch of red pepper flakes or cayenne.

White Bean Soup with Ham, Sausage and Kale

>Easter weekend just passed and it was a very incredible weekend filled with yummy food, time to cook, good wine, mimosas, family (well D’s family not mine but they are wonderful so I am not complaining!), four amazing labs (usually there are six but two stayed in Katy), and plenty of pool/sun time. Post-Easter saw D and I with a fridge that was literally overflowing with leftover food (thanks to D’s generous mom). I had two honey baked hams. One was destined for soups because it had been in the freezer since Christmas and was defrosted for the weekend, but just did not have the right texture to eat. Not a problem at the time of eating has we had a back up ham and the old one would be perfect in soup because the texture would not matter. Incidentally this old ham, also had the largest ham hock I have ever seen. It was the size of my forearm – if not bigger. So the fridge is full and I have carrots and celery and 20 pounds of ham that need to be eaten. I am thinking…you know I have always wanted to try a cassoulet. Dilemma – it is the weekday and I do not have the time it takes to make a cassoulet. I need something I can prep ahead, throw in a pot in the morning and simmer it until I get home for dinner. Additionally, Whole Foods does not sell duck thighs and I am not paying 30 bucks for a do-it-from-your-fridge meal. Solution: White Beans (which I had in the pantry), Spicy Chicken Sausage (which I had in the freezer), Ham (you are quite aware I had ham) and Kale soup. Kale later turned into Swiss Chard because WF was out of it. It was good for my first time. I can see why it is a winter trend – next time I think that I will use less liquid to make a ticker stew that the beans really stand out in (I LOVE beans). I also think that I will finish it off in the oven with a nice layer of cheese and some garlic croutons – in a nod to one of my favorites – French Onion Soup. Cassoulet – that masterful feat I have yet to accomplish – will have to wait. Don’t be intimidated by the length of this list – it is basically just the contents of a fridge, pantry and freezer thrown together to get used in time.If you have chicken thighs, those would be great to throw in this as well. You should know that I did this the incredibly lazy way – I did not put my soup broth through a strainer. I did not puree it. I did not pick out the veggies and replace with uncooked one (carrots and such lose their flavor after about two hours cooking so generally, you are supposed to replace them to obtain a soup that does not have muddled flavors). I just ate it as it was.

Time wise here is what I did. The day before cooking, I prepped all ingredients and put them into bowls and soaked the beans. Day off I brown the meat, then threw in the veggies, liquid and seasoning. Let hang out for a few hours, taste test once you get home and adjust seasoning as necessary.

  • 2 large white or yellow onions
  • 1 entire (Large) head garlic, cloves peeled and halved
  • 3 celery stalks, diced
  • 5 carrots, sliced into half inch pieces then halved
  • couple of pieces of fresh torn sage leaves, whole
  • 2 bay leaves
  • One sprig rosemary
  • 8 Thyme stems
  • Red Pepper Flakes
  • Salt
  • Pepper to taste (a lot)
  • 1.5 cups dry white wine
  • 2.5 cups Chicken Stock
  • Sun-dried tomatoes or regular tomato paste, to taste
  • Dried Chipotle Peppers or Sriracha to taste
  • 1/4 cup Parmesan or Pecorino cheese, grated
  • 2 tablespoons pesto
  • A couple of slices of toasted garlic bread
  • 2 links of Spicy Italian Chicken Sausage
  • One ham Hock
  • Handful of torn ham pieces
  • 4 cups dried Great Northern beans, soaked overnight
  • Two bunches Kale or Swiss Chard, sliced into long sliced and stems removed
  • 1-2 Parmesan Cheese Rinds (I keep old rinds in the freezer and throw them into soups to get them more depth)
  • Smoked Paprika (optional – I added it just because)

Soak beans over night in room temperature water (fill bowl with water covering the beans plus four inches). The next day, heat a good amount of olive oil in a large dutch oven. Add sausage (and whatever other meat is being used i.e. chicken thighs, duck thighs, ham hock, etc) and sear. remove from pan and add the onions, garlic, red pepper flakes, celery, bay leaves, a pinch of salt, and a small bundle (tied with kitchen string) that contains the rosemary, sage, and thyme to the pan and saute until glassy – scrapping up the bits of meat from the bottom. Once glassy, degalze the pan with the white wine cook for a couple minutes. Add beans, meat, dried chilis, cheese rind, tomato paste and a good amount of black pepper to the pan. Add the chicken stock. Stir and cover. Cook over a low heat for 2-4 hours. Taste test and add flavors has necessary. Add the greens and allow to cook for another 30-45 minutes, then remove any bones or chunks of fatty meat, chilis, and the bouquet garni from stew.  Laddle into large bowls and top with a handful of shredded cheese and a spoonful of pesto. Serve with crusty, toasted garlic bread.